These are my August blocks for the Sweet Land of Liberty sewalong on Cheri's Facebook page, hosted by Lori of Humble Quilts.
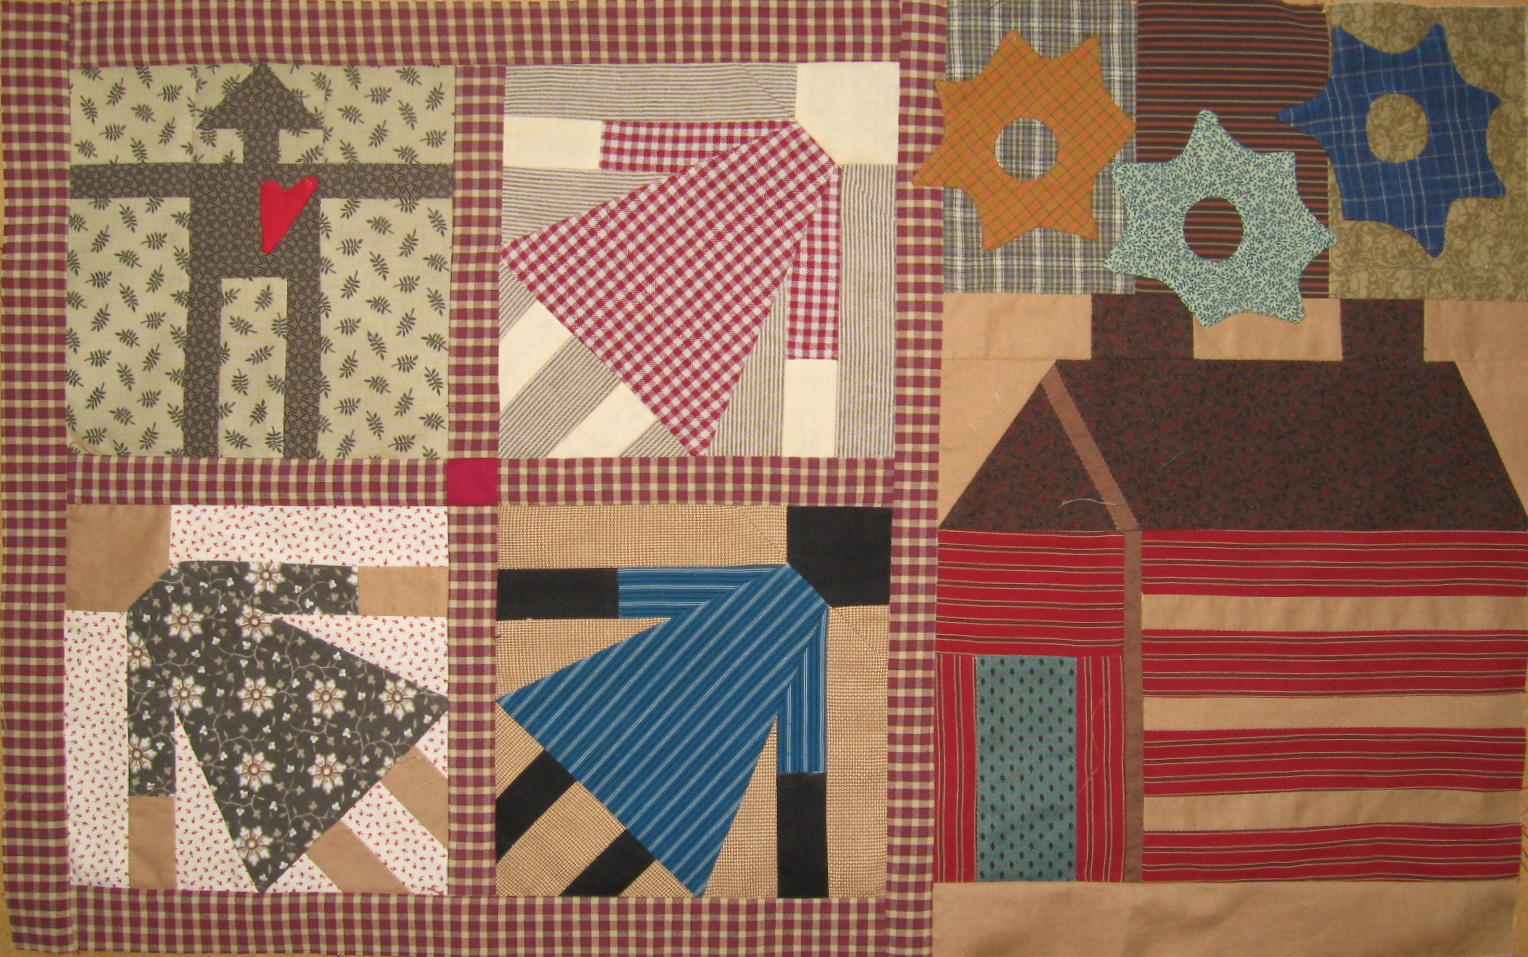
The red stars are a lot bright. They may become another color -- eventually. And that Economy Block with the yellow may not become part of this quilt. They're not sewn yet.
I did really, really consider whether to add the words to the couple-with-tree block. The original lettering was too large so I traced my couple and tree on another piece of paper, then added the letters around it. When I held it up to the window to trace the letters onto the block I just couldn't do it.
Perhaps the printed background fabric on the block was one of the reasons I decided against the letters. The print doesn't show in the photo as much as it does in person.
Last night I sewed the first two rows together. This was a challenge I did not enjoy. I altered the length and width of the Lady Liberty and pineapple blocks requiring an adjustment to the other blocks, too. There is no way this quilt will finish anywhere close to square. The left side of the quilt is about 1/2 to 1" longer than the right side.
I claimed getting this far on this quilt as my One Monthly Goal for August. I am unmotivated to finish this quilt and procrastinated working on it all month, almost dreading it. Finally, on Thursday night, as I thought about it before falling asleep, I decided to just fold up all the pieces, put them away, and forget about it. I love Cheri's quilt but I'm not in love with the process of making my own version. By Friday morning, enough sense had returned that I decided to at least finish the goal I had stated at the beginning of August. Now that I've completed that goal, I'll reconsider whether to keep going or not. I have some parts of the rest of the quilt finished but have the lower right corner and the row of stars and houses across the bottom to finish. Still quite a lot, actually.
As much as I like, enjoy, and appreciate primitive quilts, maybe making them myself isn't what I love to do. What do you do when you're "done" with a quilt but the quilt's not yet finished? Do you ever just throw it out or pass it on? Salvage part and repurpose it? Or, perhaps, you never lose interest in a project?
I'm linking this post to One Monthly Goal August Finish Link-up at Elm Street Quilts. Thanks for hosting, Patty.
--Nancy.
.
Saturday, August 31, 2019
Friday, August 30, 2019
August Cheddarback Blocks
I've learned that if I choose fabrics and cut the pattern pieces at the beginning of the month, I can work on the blocks when I have a minute or two, if it's an easy block, or between other things when it's a more challenging block. Below are the blocks for August, 2019. You can see the originals here. The first four blocks finish at 5", the last at 12".

The original Cheddarback quilt has three columns of five large blocks which makes the quilt close to square. Gay offered us the idea to add one more large block at the bottom of each column and gave us the pattern for a 12" Lawyer's Puzzle block for the bottom of left column. (Or, she said, "Please feel free to select another 12" block for your bottom row if you're not a fan of the one I'm using. It's your quilt - make it your way!" Gay's so great!) I thought a block with a stronger diagonal would fit better with the other blocks that already create a diagonal in line with where this one will be placed. I'm not sure the blue is strong enough. I think I'll have a better idea after I sew the first two columns of blocks together. This block has several names but I first found it as Lily Quilt Block and used a pattern called Eagle's Nest. You can read more about this block and its creation here.
So, that's some of what I've been doing this month. I really enjoy the challenge of finding fabrics similar to the those in the original quilt making these blocks.
I'm linking this post to
- Creative Compulsions My Bijou Life
- Peacock Party at Wendy's Quilts and More
- Finished or Not Friday at Alycia Quilts
- Can I Get a Whoop Whoop? at Confessions of a Fabric Addict
- Off the Wall Friday at Nina's blog
Thanks for hosting, ladies.
--Nancy.
.
Block 27
Thanks again to Janet of Rogue Quilter for the package of scrap fabrics she sent a while ago, I found a piece of blue fabric similar to the original for this block. Gay, creator of the blocks, suggested that if we wanted to take the easy way out, we could just make a pinwheel and applique the square to the center and cut away the back. I would have done that but the scrap of blue I had was just barely large enough to cut the five pieces to exact measurements.
Block 30
The original block had a darker brown fabric that caused the lines in the block to disappear visually. I lightened the brown just a little.
Block 28
This was a simple, straightforward block. I wonder why Miss Cheddarback used the dark blue triangles. They cause the star to almost disappear.
Block 29
This was another simple block. The pattern called for three strips of blue but I didn't have one long enough for to go from one corner to another. I cut a center square and four strips.
Block 26
The original Cheddarback quilt has three columns of five large blocks which makes the quilt close to square. Gay offered us the idea to add one more large block at the bottom of each column and gave us the pattern for a 12" Lawyer's Puzzle block for the bottom of left column. (Or, she said, "Please feel free to select another 12" block for your bottom row if you're not a fan of the one I'm using. It's your quilt - make it your way!" Gay's so great!) I thought a block with a stronger diagonal would fit better with the other blocks that already create a diagonal in line with where this one will be placed. I'm not sure the blue is strong enough. I think I'll have a better idea after I sew the first two columns of blocks together. This block has several names but I first found it as Lily Quilt Block and used a pattern called Eagle's Nest. You can read more about this block and its creation here.
So, that's some of what I've been doing this month. I really enjoy the challenge of finding fabrics similar to the those in the original quilt making these blocks.
I'm linking this post to
- Creative Compulsions My Bijou Life
- Peacock Party at Wendy's Quilts and More
- Finished or Not Friday at Alycia Quilts
- Can I Get a Whoop Whoop? at Confessions of a Fabric Addict
- Off the Wall Friday at Nina's blog
Thanks for hosting, ladies.
--Nancy.
.
Thursday, August 29, 2019
When the Idea in My Mind Doesn't Match the Pattern
I saw the quilt block here, at Oldepatchart Antique Quilts and Designs, and thought it would be perfect for an alternate 12" block for Cheddarback. I made a quick sketch.
I can often figure out sizes and how to cut simple patterns but when it came to the diagonal in the center of this block, I didn't have a clue how to figure out cutting sizes. I began searching for a pattern. I found similar patterns but none that had the white squares in the center cut off as much as in my sketch.
I learned that the pattern I found has several names:
There is some variation in color placement among those blocks but they're essentially the same pattern pieces. But none were just like my sketch.
I chose the pattern in Judy Hopkins's book because she gave cutting instructions for a 12" finished block.
I was disappointed that the inner triangles in the corners didn't have more space between them when my sketch showed more space. When I looked at the original blocks again I realized that I couldn't find a pattern that matched my sketch because my sketch was not accurate!
My finished block looks like this. I can see now that if I had made the 9-patch in the center a little larger and cut it down a little, the block would have looked more like my sketch.
I think this block will work just fine for Cheddarback, though I'm not sure the blue is dark enough. Ah well, done is done.
Do you make accurate sketches of blocks you see, like, and think you might like to make, or are yours more like mine -- quick and messy?
--Nancy.
.
I can often figure out sizes and how to cut simple patterns but when it came to the diagonal in the center of this block, I didn't have a clue how to figure out cutting sizes. I began searching for a pattern. I found similar patterns but none that had the white squares in the center cut off as much as in my sketch.
I learned that the pattern I found has several names:
- Lily Quilt Pattern (at the website above) and in Ginny Beyer's The Quilter's Album of Patchwork Patterns
- Lilies or Lily in Rhoda Ochser Goldberg's The New Quilting & Patchwork Dictionary
- Des Moines in Maggie Malone's 500 Full-Size Patchwork Patterns
- Eagle's Nest in Judy Hopkins's 501 Rotary-Cut Quilt Blocks
- The Corner Star, The Crowfoot, The Spring-time Blossom, and Sweet Gum Leaf in Beyer's The Quilter's Album...
There is some variation in color placement among those blocks but they're essentially the same pattern pieces. But none were just like my sketch.
I chose the pattern in Judy Hopkins's book because she gave cutting instructions for a 12" finished block.
I was disappointed that the inner triangles in the corners didn't have more space between them when my sketch showed more space. When I looked at the original blocks again I realized that I couldn't find a pattern that matched my sketch because my sketch was not accurate!
My finished block looks like this. I can see now that if I had made the 9-patch in the center a little larger and cut it down a little, the block would have looked more like my sketch.
I think this block will work just fine for Cheddarback, though I'm not sure the blue is dark enough. Ah well, done is done.
Do you make accurate sketches of blocks you see, like, and think you might like to make, or are yours more like mine -- quick and messy?
--Nancy.
.
Tuesday, August 27, 2019
Using Prismacolor Pencils to Mark a Quilt
My supplies to mark this quilt were cardboard circle templates and Prismacolor pencils. I tried three different colors that were slightly contrasting to the fabrics in the quilt but dark enough that I could see the color.
I didn't know if the marks would wash out so I wanted a color that I could live with if they didn't.
You can see in the photos below how the marks looked on the fabrics. (Click the photos to enlarge them. They'll open in a new window and you'll be able to click again to see them even larger.)
The marks were harder to see after I'd quilted over them. I wondered if they would wash out. I could live with the quilt if they didn't but I hoped they would come out.
After the first wash and dry there were only the slightest traces of colored pencil on a few of the blocks. I wasn't worried about them because they didn't stand out or distract from the quilt as a whole. By the second wash and dry there was no trace of colored pencil on any of the blocks.
I don't know the content of the colored leads in the pencils and it's possible that they contain acid or something else that would damage the fabric over time. Should this quilt last for a hundred years, it's possible the lead would eat through the fabric and make holes, but I doubt that would happen. Of course, I can't imagine this quilt being around that long anyway.
When I hand quilt I usually use masking tape to mark straight lines, use a seam as a guide, or do free-hand Baptist Fans. I used a lead pencil once and now Prismacolor pencils. In one of Gwen Marston's books she recommended Berol Verithin white or silver pencils, Berol Karisma pencils, and graphite Aquarelle pencils. Not having access to any of those, I tried Prismacolor.
Though the Prismicolor pencils do not make a fine line and needed frequent sharpening, I liked using them. It wasn't too hard to mark on the quilt and I was pleased that the color washed out. I would use the them again. One thing I would not do is use a pencil in a color that is a high contrast to the fabric in the quilt -- never black on a white quilt -- even though it would probably wash out.
Have you ever used colored pencils on a quilt or do you have some favorite way to mark a quilt?
--Nancy.
.
Wednesday, August 14, 2019
Little Rubies, Green Fabric, Quarter Cabins, + ScrapHappy
I haven't written about Little Rubies for a while. She is sandwiched, basted, and a little less than a third quilted. It's going very slowly, though. Perhaps because it's summer, or maybe because I'm devoting more time to hand applique, or maybe because I'm a little tired of her.
Robin's post reminded me how peaceful and comforting I find hand quilting. If I quilted one complete fan (six arcs in sequential sizes) every day, I could have this quilt finished in 49 days. I doubt I will succeed with that schedule but I could at least work on the quilt every day.
This is a poor photo just so the quilting is visible. I don't mark fans which means some of the arcs are a little wobbly. I don't mind. This is just a homey, comfortable quilt, quilted to keep the three layers together, not for show.
And then there's that green fabric. Six yards, all in one piece. I've had a heck of a time talking myself into cutting it, or even washing it. I'm much better at using scraps than cutting into yardage.
But I washed it today and I measured how large to cut the side-setting triangles. I'll start with a few that are 7", just to see how they work. They'll be a little large but it's easier to cut smaller than make larger. The fact is, I've never made strips from squares and triangles and I don't exactly know what I'm doing. Let's hope I've got the idea right in my mind!
Sometimes, as with this quilt, I wish ideas for quilts popped into my head fully formed with all the details for the quilt from start to finish: the colors and fabric to use, the sizes to cut, placement of pieces, the order to sew.... I don't suppose there would be much fun in the process if that happened, though, would there? I'm sure I would get bored with it quickly.
For anyone who's reading for the first time, on the left are the scrappy quarter log cabin squares I'm using to create a strippy quilt, and on the right is my current idea for the layout, but with more colorful leaves, I think.
Just for fun, this is a photo of today's grey and ominous thundery sky. I love thunderstorms!
From these clouds we had a little rain and no thunder or lightening. A few minutes after taking this photo, the sun shone through the clouds on the opposite side of the road. Glorious and beautiful!
I'm linking this post to
> ScrapHappy at talltalesfromchiconia
> Wednesday Wait Loss at The Inquiring Quilter
> WOW at Esther's Blog
> Midweek Makers at QuiltFabrication
Thanks for hosting, ladies.
Thanks for visiting!
--Nancy.
Wednesday, August 7, 2019
One Monthly Goal for August, 2019
Motivation is hard to come by these days. Thank goodness for online, public declarations of monthly goals!
My goal this month is to catch up with Lori's Sweet Land of Liberty sewalong, hosted on Cheri Payne's Facebook page/group. Below is a photo of what I made the last time around but didn't finish.
This is what I should be doing for August with notes about what I still need to do:
> 4 Economy blocks
> 4 Snail's Trail blocks - done
> couple and tree - done EXCEPT for the lettering
> checkerboard and stars - done EXCEPT for appliquing the stars
So I'm more than halfway finished with that part.
The other part of the August sewalong includes sewing the top part of the quilt together.
These are the pieces to be assembled, mostly ready to go. I'll have to decide about
> the flag near the log cabin (whether it goes or stays)
> whether to add a heart to the sawtooth star block, and
> whether to add the three flying geese to the flying angel block
You may remember that I increased the length and width of the two blocks on the left, which means I'll have to adjust the other blocks in that row so they all fit with the top section. This quilt is such an improv-style quilt that I doubt the changes will make much of a noticeable difference in the finished quilt. I just wanted it to be longer and wider than the original.
I'm just under the wire for the August One Monthly Goal link up at Elm Street Quilts!
--Nancy.
.
Thursday, August 1, 2019
Lady Liberty, Little Dolls, and a Tinman
These are last month's blocks for Sweet Land of Liberty which I didn't finish till this month. This was a sewalong last year at Humble Quilts, repeated this year at Cheri Payne's Facebook group, which explains why I have some months' blocks completed already.
My Lady Liberty is different than Cheri's pattern. I based this one on Robin's Liberty though they don't look much alike. I also lengthened and widened both of these blocks.
Lady Liberty needs a face. I think she looks very serious so perhaps I'll draw her features similar to the face on the right. Keep it simple for a primitive quilt.
Here's Liberty and her shadow. Don't you think she looks elegant on the right, sturdy on the left?
I finally decided to draw the words and images on the center of the sawtooth star. I tried to find Micron pens in colors, specifically red, blue, and green, in the correct size. I had a 50% off coupon for Michael's but they were doing a reset and had put all the pens in the back. No help there, so I used the 08 black I already had. I might add a little red heart and a gold star. I traced the pattern in reverse on freezer paper then pressed the fabric to the paper and traced the pattern. Worked like a charm.
We were to make 4 economy blocks and a dozen flying geese. I just keep making both so I hope these aren't ones I posted last month.
I finished July's blocks the first time Lori hosted this sewalong last year. Here they are, except for the 4 flying geese, which I didn't photograph.
Many thanks to Lori for hosting this sewalong again. I think I might be able to finish the top this year!
--Nancy.
.
Subscribe to:
Posts (Atom)