Tuesday, April 30, 2013

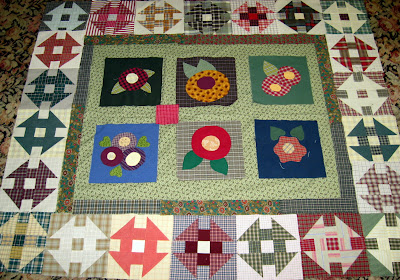
Children's Garden, Applique

The quilting on the center of Children's Garden is almost finished (unless I decide to add some more quilting in the flower blocks).  I set a goal to have the blocks stitched into a top and have it layered by the end of this month, so I met that goal but I really hoped to have a little more quilted.  If only I hadn't been down with the flu for two weeks. 

I think I mentioned before that the flower blocks were samples to see if I could successfully applique.  I wanted to learn to applique so I could participate in the Airedale Rescue Quilting Bee, an online group of women who put together a quilt every year then raffle it and use the funds to support Airedale Rescue.

I can do the technical sewing like making my stitches nearly invisible but I sometimes struggle with fabric and color choices. 

Airedale terriers can be challenging dogs.  They're often spirited, full of themselves, and want to run the show.  They need strong-willed owners with a firm hand and a sense of humor.  If you laugh at an Airedale's antics he'll enjoy the humor and do his best to keep the laugh going by repeating the behavior or coming up with something even more extravagant. 

I've loved and been loved by several Airedales over the years.  Our current 'dale, Hannah, is a rescue girl who came from a situation of abuse.  We often think the spirit was beaten out of her in her previous life.  Oh, so, slowly, she's coming around but she'll probably never be as enthusiastic and gregarious as an Airedale who's lived in a healthy environment since puppyhood.

Even so, I feel honored to be loved by such a sweet Airedale.


I'm linking this post to A Lovely Year of Finishes at Fiber of All Sorts as both a finish (for layering and pin-basting the top and as a goal of finishing the quilt, including hand quilting and binding it in May. Thanks, Shanna.

--Nancy.
.

Traveling Stash Box 4 Wants to Visit You

Box 4 is at my house and ready to travel.  Perhaps you'd like to add your name for a chance for the box to come to your house?  Since it doesn't have a passport, it can travel only in the U.S.

There are fabrics with stripes,

 fabrics with prints,

and fabrics with gold or silver.

And there are also some magazines, patterns, and notions.

I kept these from the box
 and added 1 1/2 yard Kona white and 3 fat quarters.
Since the box will be here a few more days I may add to it.

Rules and Guidelines
  • Be an active blogger -- post about receiving the box and the giveaway in a timely manner.
  • Update the travel log in the box to let others know where the box has been.
  • There is a list of rules and guidelines in the box -- be sure to follow these to keep the box full of quality items and the experience positive for everyone.
  • You may take any items from the box just be sure that you are replacing them with quality and comparable items. (Guidelines for fabric below).
  • Ship box to the next person timely -- and communicate tracking information with recipient.
  • Shipping is within the US only.

Important Things to Remember
  • Please ensure that items in the box are quality. If items in the box are poor quality they should be removed. Items that are being removed can be offered for optional inclusion to the next recipient. Poor quality items can be discarded but this should be done with discretion. 
  • Only include items that you would be proud to own -- this is not a dumping ground for outdated or worn items.
  • Items should be free of smoke, odors  and pet hair.
  • You must replace all items that you take with items of equal value and replacing with more than you take is welcome.
You can read further details here and see what other boxes are traveling here.

So, if you'd like Traveling Stash Box 4 to visit you, please leave a comment on this post before midnight (in any U.S. time zone) on Tuesday, May 7, 2013.  I'll choose a winner on May 8.

--Nancy.
.

Monday, April 29, 2013

A Lovely Little Notion

I found this adorable little spool holder in Jinny Beyer's book, Quiltmaking by Hand, and fell in love with it.  I believe it is a very old one in her collection which means, of course, that one cannot buy a new one even if one wanted to own one.  I would love to hold it but I was almost as happy just to make a drawing of it to enjoy.

I love old sewing notions.  New ones, too, for that matter, but especially the old ones.  It doesn't necessarily mean that I want to own them all but I do enjoy looking at them, holding them, imagining using them.  When I go to a flea market or thrift store and find something I love, I carry it around as I shop all the while telling myself that I'm possessing it while I'm in the store:  it was "mine" for a few minutes, and then I let it go to someone else.  I can usually (though not always) talk myself out of purchases this way.

Let's face it, one of these days or years I'll die and my children will just have to pass on whatever's left.  No need to buy more for them to pass on.

Okay, I'm feeling a little better after this awful flu and could have photographed the Traveling Stash box today IF it had not been the greyest, rainiest day so far this spring.  I hope tomorrow will bring a little brightness and sunshine so I can take photos and post the box.  I need to move it from my house to one of your houses!

--Nancy.
.

Wednesday, April 24, 2013

Not Much Fun - W.i.P. Wednesday

I'm making slow progress hand quilting Children's Garden.  I used Warm & Natural batting because I had a piece available but it doesn't quilt as easily as the Cream Rose did.  Of course it could be my lack of experience in hand quilting... but I'm not enjoying it much.  The next time I use a cotton bat I think I'll go back to Cream Rose; or perhaps I'll try a bamboo, wool, or other kind of bat.  I think wool batting would be easy to hand quilt through but what about laundering?  Anyone have experience with other brands and varieties of bats?

Our cherry trees bloomed on sunny Tuesday but I was "out" with the flu (no fun) so I missed photos that day.  Now it's cool and grey.  I'm sure (well, almost sure) I'll feel better by the time warm and sunny spring days return (unless that's tomorrow).

I'm linking this post to W.i.P. Wednesday at freshlypieced.  Thanks, Lee.

--Nancy.

P.S.  I won a Traveling Stash Box.  I want to enjoy it when I open it so I'll wait another day or two.  I'll post about it soon.


Wednesday, April 10, 2013

This Week I've Been . . .

 . . . sewing more blocks for Sunday Morning.  I have 70 finished; 30 ready to be cut; and 14 more in progress.  My blocks are 8" before sewing, slightly smaller than the ones in Sunday Morning.  It's been a while since I've worked on this quilt.  I'll have to recalculate the size I want the quilt and how many blocks I'll need.


. . . playing with the leftover blocks from Easy Street.  There's a little (maybe a lot!) too much red in this photo.  The blocks are laying on my ironing board which has a reddish cover.  I don't know how I'll put these blocks together but it sure is fun to play with them. 


. . . and stitching together this top and layering it.  Now that it's all laid out it looks like I'll have to cut some batting off one side and add it to one end.  I suppose I should do that before I pin pin-baste the layers together.  I hope to have it ready to begin hand quilting tomorrow.

That's been my week.  It sure is nice to have more than one project in the works again.  I was getting tired of posting photos of High Five for Brenna every week!

It you want to see what some things other bloggers have been working on this week, click over to W.i.P. Wednesday at Freshly Pieced.  Join in if you'd like.  Thanks for hosting, Lee.

--Nancy.
.

Monday, April 8, 2013

Fitting It Together


The top is stitched together but it doesn't lie perfectly flat.  There aren't any huge "waffles" around the edges, just slight ripples in 2 or 3 places.  Should I be concerned?  They look nothing like the "pucker" in this vintage quilt - see 3rd photo down.  Which makes me think that if that pucker can be quilted in, these ripples could be quilted in.

I struggled with measurements (see photos of notes below) in an effort to be accurate.  The outer edges of the center had to meet the measurements of the churn dash blocks.  It was a challenge.  In the end it seemed easiest to use finished measurements throughout then add 1/2" before cutting.


I decided I couldn't live with wide borders on two sides and narrow borders on the other two.  To even out the inner red border I added spacers.  Is that what they're called?  You can see one to the right of the blue and red churn dash block, above.  When the quilt was still in pieces on the floor, I put them in and asked my husband what he thought.  "Great," he said.  "About the extra little strips?" I said.  "What little strips?" he asked.  They weren't obvious to him and I hope they don't stand out in the finished quilt.

I don't know whether to add an outer border or not.  Churn dash blocks are not very forgiving.  There's 1/4" for stitching and that's it.  If I need to square up the quilt after quilting and before binding, I won't have wiggle room if there's no border.  On the other hand, I like the idea of a binding looking like a narrow border.  Anyone have any experience with squaring churn dash blocks after quilting?


These are my working notes (above).  (Click to enlarge.  Click again to see even larger.)


As I was getting ready to cut out the extra fabric behind the flowers and leaves I thought how pleasing the applique stitching looked with its gentle (albeit not exactly even) rhythm.  I cut away the fabric inside the stitching so I would have one less layer to stitch through.

About the backing.  In the top photo along the upper edge you can see backing possibilities.  My husband votes for the red.  When I told him I didn't have enough red for the whole back, he sounded disappointed.  I suggested using the red and grey/brown, 2nd from the left.  He had a ho-hum response.  I have several pieces of dark green plaid that I could piece together for part of the back but I was hoping to take a really simple route.  What do you think?

I hope you're making good progress with whatever you're working on.

--Nancy.
.

Friday, April 5, 2013

Last Hurrah for High Five for Brenna

Now that Brenna's High Five is completely finished, I wanted to post details about it.

The quilt took 7 months from start to finish.  (Am I slow or what?!!)  I began making blocks in September, 2012, and bound, washed, and dried it on April 1, 2013.

The blocks are cut at 5" and are 4 1/2" finished.  There are 16 x 20 rows equaling 320 blocks.  Each block has 5 pieces of fabric and four seams.  All fabric was pre-washed.

The backing is a tone-on-tone natural/creamy print.  (Brenna said she liked plain backs best.)


The batting is a Mountain Mist Cream Rose 100% cotton bat.  Shrinkage was about 9%.  It was hand quilted with an all-over arching pattern that, if it had been more orderly, might have been a clamshell or Baptist Fan pattern.  The arches are about 1" - 1 1/4" apart.    I used Connecting Threads all cotton "Cream" and a size 7 needle.  The stitches are 4-6/inch.  (I'm still a beginner but improving.)

Measurements:
before quilting:  72" x 90"
after quilting:  71" x 88 7/8"
after binding:  71" x 88 7/8"
after washing and drying:  68 3/4" x 85"

Reminders to self:
  • When choosing quilt size, make the quilt larger to account for shrinkage, especially if using a cotton bat.
  • Everything takes longer than you think it will.
  • If you haven't quilted recently, it will take a while to build up quilting callouses.

I don't think any photo will show the richness of this quilt (at least not any photo I take!).  I love it.  I love looking at individual blocks and seeing what fabrics worked together to make an aqua or a tan or a red or a blue block.  It's such fun.  Some of the fabrics were scraps that were left over from someone else's project and I have no more of them.  Some, I wonder where they came from because when I look at them they I can't remember ever seeing them before.  Part of me wants to keep this quilt for reference. . .  but I suppose I should give it to my daughter, huh?  Especially considering that I made it for her.


I'm linking this post to the April 5 edition of Finish It Up Friday at Crazy Mom Quilts, hosted by Amanda Jean.  Thanks so much, Amanda Jean.

--Nancy.
.

Wednesday, April 3, 2013

From the Outside In


I'm playing with the Children's Garden quilt now.  Except it's not all play because the blocks are different sizes:  the churn dash blocks will finish at 7 1/2", the flowers at 8 1/2".  I'm going to have to work to make the blocks fit together.  Math is not my strength, especially when I have to consider those 1/4" seams on two sizes of blocks. 

I've never made a quilt from the outside toward the center.  Of course I'll sew this from the center toward the outside but I need to calculate the outside measurements before I can know the sizes for the sashings, corner blocks, and border for the center.  I've always sewn quilts where the border was the last thing to be measured, cut, and stitched.  This will be a new challenge for me.

My plan of attack is this:
  • Calculate the difference between 2 flower blocks and 4 churn dash blocks.  That will tell me how many inches I can use for the sashings and borders on the narrow side.
  • Calculate the difference between 3 flower blocks and 5 churn dash blocks which will tell me how many inches I can use for the sashings and borders on the long side.
  • Sew the the end and side churn dash blocks together (but not the corner blocks) to be sure I'm close to accurate.
  • Measure, cut, and stitch the corner blocks and sashings for the center blocks.  Add the border around those blocks.  Add the churn dash blocks, and add a final border.
I've done preliminary estimations and know that the measurements available for sashings/borders for long and short sides are not equal.  But if I want to use square corner blocks the sashings will have to be equal and I'll have to make the borders between the flowers and the churn dashes unequal.


I'm still playing with flower placement and fabric for the inside border.  You can see two possibilities in the images above.  I thought the dark red might not work but I think it's better than the dark green.

My intention is to finish sewing the top, choose batting and backing, and have it sandwiched by the end of April.  I plan to have it completely quilted and bound by the end of June (or before if I can manage it).


I'm linking this post to:


W.i.P. Wednesday at Lee's Freshly Pieced.  It's being hosted this week by Natalie from Greenleaf Goods.  Thank you, Lee and Natalie.

A Lovely Year of Finishes goal-setting party for April at Fiber of All Sorts.  Thanks for hosting, Shanna.

2013 2nd Quarter Finish-A-Long with Leanne at She Can Quilt.  Thanks, Leanne.


Fresh Sewing Day at Lily's Quilts.  Thanks for hosting, Lynne.


Thanks for visiting.
--Nancy.
.

Tuesday, April 2, 2013

Procrastinating a Binding

Brenna was home over the weekend and chose the above fabrics for a scrappy binding on her High Five.  On Saturday I cut and stitched the fabrics into one long strip but didn't get any further.  I don't sew on Sunday so Monday was the day to get the binding onto the quilt and get it finished.

On Saturday night I had a dream about the binding.  There it was all cut and ready to be sewn on the quilt.  I picked up the quilt, sat at the machine, laid the binding along the edge of the quilt and began to sew.  Great progress, almost done.  I awoke with a start.  Oh, no!  That's not how to sew a binding on a quilt!  (I know because I've tried that before and ended up with a ruffly-edged quilt.)  Whew!  I'm glad it was only a dream.  When I came downstairs the next morning, there was the quilt on the floor exactly where I'd left it.


Bindings are my least favorite part of quilting.  I think a binding can make or break (or at least enhance or detract  from) a quilt.  A fabulous quilt will look less than its best with a poorly measured and sewn binding.  Thus, my trepidation.  Even though my goal was to completely finish the quilt (binding sewn and stitched) on Monday, I found myself coming up with ways to avoid it.
  • Better check on Airedale Hannah.  She might be out in the yard digging.
  • Oh!  That load of laundry's finished.  Better go change the washer.  (Repeated every half hour or so, at least four times.)
  • Look at all those threads on the floor!  Gotta vacuum.  (You know it's bad when I choose cleaning over quilting.)
  • Look at all those crumbs.  Someone forgot to clean off the counter after breakfast....
  • Breakfast.  I forgot to eat breakfast!  I need to eat so I'll have energy to do that binding.
  • Gosh, I'm sleepy.  Maybe a nap will help.
  • Etc., etc.  
Determined to meet this goal and be finished with this quilt, I measured the binding, laid it on the quilt, measured again, pinned, and sewed each side.  By late afternoon the binding had been machine stitched in place and I spent the rest of the evening folding it over and blind-stitching it on the back.  I think I got it right.  I don't think there are any ruffles but we'll see after it comes out of the dryer.

The label on the the Mountain Mist Cream Rose batting bags says, "Washable with care, when quilted properly".  What care, exactly?  Regular wash, gentle wash?  Dryer, no dryer?  The quilt is going through a regular wash cycle, and will dry on moderate heat.  If I were a superstitious person, I might cross my fingers....


I'm linking this post to Small Blog Meet, a link-up for bloggers with fewer than fifty follows.  It is hosted at the beginning of every month by Lynne at Lily's Quilts.  If you're a blogger with only a few followers and would like to meet more, please link with the rest of us.

I'm also linking this post to Let's Get Acquainted! Monday Link Up by Plum and June which is hosted this week by Taryn at from Pixels to Patchwork.


--Nancy.
.

Monday, April 1, 2013

Never Trust a Groundhog...

... to predict the weather.   He said we'd have an early spring but it's just not so.  With snow last week, there is only one flower peeking out of the ground and it's indoors!


There are three gorgeous blossoms on the tall stalk of this amaryllis.  Can you see the sparkles on the petals?  The petal on the upper right glistens like tiny sugar crystals have been dusted on it.  Amazing!

If you're in the northern hemisphere, I hope you have spring weather to welcome each day.  If you're in the southern hemisphere, I hope the end of your autumn and the beginning of you winter is beautiful.

--Nancy.
.
Related Posts Plugin for WordPress, Blogger...